Nuffnang

Showing posts with label ELF. Show all posts

Saturday, April 16, 2011

All that is purple-ish: Item 2 - Avon Simply Pretty Colorbliss Amethyst and ELF Essential Lipstick Gypsy

I'm gonna start a series called "All that is *insert colour*". Basically, I'm gonna collect my stuffs that is in a particular group of color, one item for each day. In the post, I'm gonna write a short review or simply thoughts that I have about the item. I'm gonna start the series with the colour purple.

Left - Avon Simply Pretty Colorbliss Amethyst, Right - ELF Essential Lipstick Gypsy
In the picture above, I'm using Avon Simply Pretty Colorbliss Amethyst. Even tho Avon Simply Pretty line targetting younger demographic, tween especially, the quality is not bad at all, pigmented, easy to apply and non-drying. I haven't try it long enough to test how long it would last. It's a shimmery shade, but not that frosty.

In the picture above, I'm using ELF Essential Lipstick Gypsy. ELF Essential Lipstick is my favourite matte lipstick. The shade Gypsy is super awesome! The mauvy shade really bright and beautiful. It's last quite long, from 4 to 5 hours, it could be even longer! The formulation is a lil drying, but not too bad.

Friday, April 15, 2011

All that is purple-ish: Item 1 - ELF Studio Cream Eyeliner (Purple)

I noticed I'm slowing down with blogging lately. The thing is, I started to go to gym and play volleyball, and that takes a lot of energy. Doing a look or writing a review takes a lot of energy and time. So until my body get used with the abused, I need to update this blog with something more lighthearted and simpler. I'm gonna start a series called "All that is *insert colour*". Basically, I'm gonna collect my stuffs that is in a particular group of color, one item for each day. In the post, I'm gonna write a short review or simply thoughts that I have about the item. I'm gonna start the series with the colour purple.

ELF product can be a hit or miss, this one in particular is a hit for me. The purple colour is opaque and the eyeliner is easy to apply. I usually prefer to bring this in my travel bag since it is the least fussy among my cream eyeliner.
The brush that comes with the eyeliner actually not bad all, short and tiny, perfect for travelling or tiny makeup bag.

Thursday, March 31, 2011

Smokey Brown Using ELF Brightening Eye Color in Day 2 Night


Day 2 Night IMO is one of the best palette ELF gotta to offer. The color pigmented and easy to blend.

Friday, February 11, 2011

Swatches: ELF Bronzer and Highlighter


From left to right:

First four are from ELF Studio Warm Bronzer
5th is from ELF Studio Contouring Blush & Bronzing Powder
6th is ELF Essentials Healthy Glow Bronzing Powder Matte Bronze
7th is ELF Essentials Healthy Glow Bronzing Powder Luminance

Tuesday, February 1, 2011

Swatches: ELF and Silkygirl Blushers

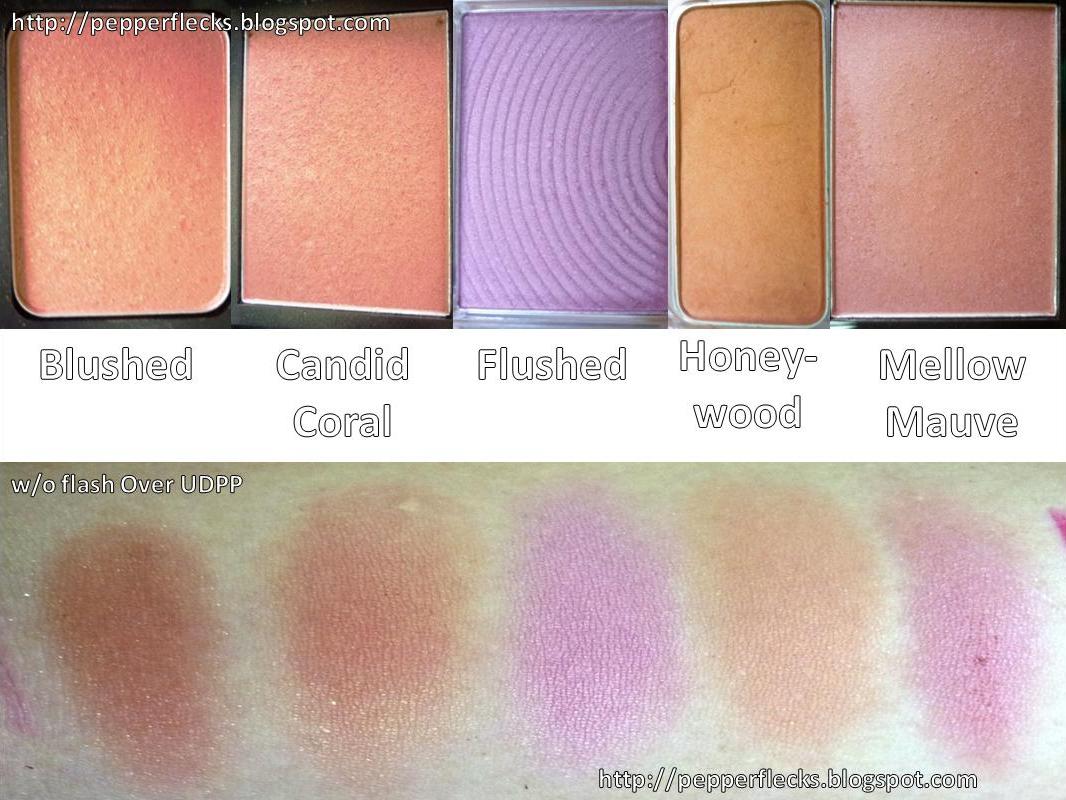
Here are swatches of some of my blushers. I will do full review once my blushers collection become static (no new blusher). I'm not good with color description, but I try my best.
  1. Blushed - ELF Studio Contouring & Bronzing Powder (Pinkish coral w/ slight gold glitter) note: Over UDPP, Blushed appear less pinker and more brownish.
  2. Candid Coral - ELF Studio Blush in Candid Coral (Dirty coral w/ golden sheen)
  3. Flushed - ELF Essential Natural Radiance Blusher in Flushed (Mauve-y pink w/ very little silver sheen)
  4. Honeywood - Silkygirl Blusher in Honeywood (Matte corally orange-brown lol~)
  5. Mellow Mauve - ELF Studio Blush in Mellow Mauve (Purple mauve w/ purple sheen)


Swatches in different lighting condition

p/s: Aisyah and I received our swap items today at almost the same time (what a coincidence) and I'm glad to tell you that I received two more blushers to play with. Unfortunately, the blusher would make their appearance a lil bit later as I got quite a few post on queue to be publish. Thanks Aisyah for the awesome swap!

Saturday, January 29, 2011

Review and Swatch: ELF Essential Clarifying Pressed Powder.

ELF Clarifying Pressed Powder is my favourite pressed powder. It's cheap and it works! It claims to mattify skin and treat breakouts. I don't really think this product contribute much in reducing or treating break out, but it does works in eliminating shine by absorbing oil.

I used it most of the time to set BB Cream or foundation that is too dewy. I have oily skin, so dewy look looks good for the first 30 minutes only. Longer than that, I would look line frying pan. What makes this powder works great for that purpose is the ingredients. It contains talc, mica, kaolin and cyclomethicone. I think most of you already know how kaolin works wonder on oily face.

Packaging of this product aren't that good since it's only price $1. It comes it cheap flimsy plastic container with useless powder puff. I use brush to apply this product. The lid of this product comes off easily and the hinge breaks with little amount of pressure. The powder have no noticeable scent and the texture varies, I think depending on which batch it was made. I have some that are just okay, some that is to hard to pick up using brush and some that crumbles with the slightest touch.

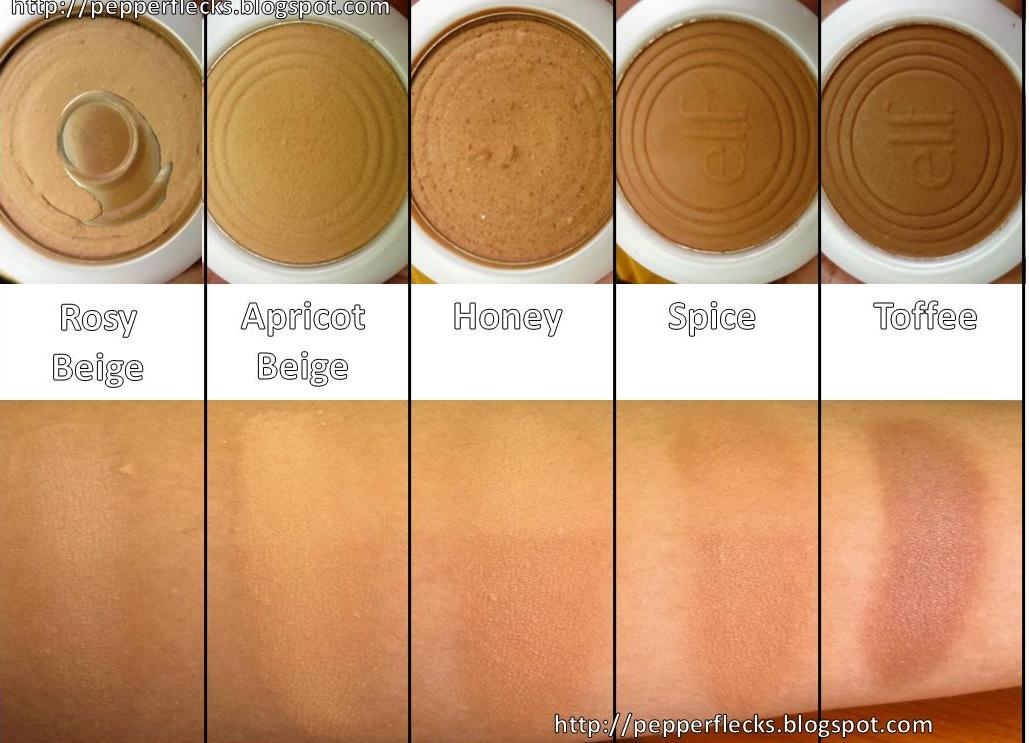
Finding the right shade is months long quest for this powder. I first started with Rosy Beige, but it's too light and too pink for me. So I tried Honey for the next spree, but it's too dark eventho it have correct undertone. So I thought Apricot Beige would be a good match, and yes it is. I also bought Spice and Toffee as I thought it might work as matte contouring powder. I haven't properly used the two for that particular purpose, but from the swatches below, you can see how orange Spice is. So I might used Spice for blusher or something. Toffee shade is okay for contouring.

In swatches picture below, the product applied over UDPP on the lower half (across my arm horizontally) of the swatch and over bare skin on the upper half of the swatch. That's why the bottom part appear a little darker.
Powder in the pan and swatches.


Top: Natural light. Bottom: With Flash

I would definitely recommend this product, especially if you can find shade that works for you.
I wouldn't repurchase at the moment since I'm still on makeup shopping ban, but once it over, I'm gonna restock tonnes of Apricot Beige.

Thursday, January 27, 2011

Review and Swatches: ELF Studio Complete Coverage Concealer.

I ordered this concealer on the very week it was first available in ELF website. So, there are no reviews available at that time. While waiting for the concealer to arrive, more and more review of this concealer can be found online, I'm a lil bit disappointed since the reviews are mainly negative review.

The shade that I picked was light. I was actually going for medium, but my friend convince me that light is a better match. She's actually right.

The product come in typical ELF Studio packaging, and a very tiny concealer brush. When it first came, I can see clear drops of moisture on the product surface. This drops of moisture make the concealer become very runny when I first try it on. After sometime, when the top layer been used up, the concealer become a lil bit better. but it is still hard to work with (gonna explain that later).

The palette comes with 4 concealer in different shade. The first two from the left is two light for my skintone, while the other two works okay. However I prefer the one in far right (in picture below) as it have yellow undertone while the second one from the left is a lil too pink for my skintone (I have strong yellow undertone). I'm not that good at describing color/shade. So let the picture below do the talk.

The concealer have weird creamy consistency. I tried a lot of application technique, over the period of two weeks, to make it work.
  • Swiping it on caused the concealer to be extremely streaky
  • Patting it on would make it become very cakey and streaky after 5 minutes you applied it.
  • Stippling is the only way to make it work. I use Everyday Mineral Eye Kabuki brush.
IMO, this concealer coverage is sheer. It work well brightening my under eye dark circles, but not good enough to cover it. It help reducing redness on my cheek and around my nose. But no matter what I do, it would crease around my nose. I tried building the coverage up by layering the concealer, it could be done, however it would start being streaky and cakey.

I tried to use this concealer under and over BB Cream, it didn't work. It become patchy and cakey. Then, I tried apply it after moisturiser and set it with pressed powder (again, I need to stipple the powder on). It looks fine. But I have to control the way I apply pressed powder so that the concealer won't look cakey.

With all the tedious work to make this concealer work, I had facepalm moments when it come to how long this product last. One hour later, the concealer settling into fine lines. 3 hours later, it starts to look cakey. 5 hours later, I removed it altogether and went makeup free for the rest of the day. I tried it again the next day, the very same thing happen again.

As conclusion, not recommend at all and unless the formulation become much better, I would not repurchase this product.

p/s: Noticed that I used the 'cakey' generously in this post? XD

Wednesday, January 26, 2011

Swatch: ELF Essential Brightening Eye Color over UDPP

I'd done review and swatches for ELF Essential Brightening Eye Color here. Honestly, I'm not that happy with the swatches picture. Especially the one without flash.

I bought Urban Decay Primer Potion in pro size last December, so I got lots to use for swatches.
Since I recently depotted all my ELF eyeshadow quad in to a CD case, I changed the pans position, but still group within its original quad.

All swatches done over UDPP. First row-natural light, second row-with flash, third row-eyeshadow in the pan.


I hope this post is useful for those looking for swatches picture of this quads since the one in ELF website is very very inaccurate.

p/s: I try my best to get the picture match as much as possible to RL color. As usual, different screen show the picture color slightly different.

Monday, January 24, 2011

DIY: Reviving Dried Up Cream Eyeliner.

Gel and cream eyeliner for me is one of the best makeup product for eyelining. Pencil liner, regardless of quality smudge on me, liquid eyeliner? I wish I have steady hands and I always managed to transfer the liner to my upper lid. So gel/cream liner is the only thing that works for me.

Typical gel/cream eyeliner packaged in jar with very large opening. The opening cause moisture in the product evaporated and we're left with dried up liner. Any gel or cream eyeliner will dried up, it's just matter of time. Even MAC paint pot dried up in its glass jar. There are even cases when the eyeliner arrived to the customer dried up (this happens a lot with Coastal Scents gel liner)

There are few tips on preventing gel/cream eyeliner from drying up
  1. Keep in glass jar. I don't really know why, but I keep hearing people talking about how gel or cream product in glass jar didn't dried up as fast as the one in plastic jar.
  2. Cap the jar tightly.
  3. Store it upside-down.
At times, even with all those prevention measures, the eyeliner still drying up. That's what happened to my ELF Studio Cream Eyeliner. I had it since June/July and boy, it actually shrink significantly since it starts drying up. The eyeliner become harder and harder, and I had to swirl my brush and waste so many product to make it soft enough to line my eyes. I'm not willing to throw it away. So I take out some and mix it baby oil, it become creamy again, but it smudge terribly. I wanted to try using MAC Fix+, but then I have to go out and buy one.

And then, one day, an awesome makeup guru uploaded a video in YouTube and it's the very video that I need to revive my eyeliner! Koren aka EnKoreMakeup come up with a way to revive gel eyeliner, so I thought it might work for cream eyeliner too. Go and watch the video, you'll see what a genius Koren is :) In the video, he explains what actually happen, how to solve the problem and share some useful tips.


After I watched the video, I was too excited to try it, but I don't have any product that he actually used in the video. So, I have to postpone it. Luckily, I thought of using Clinique Dramatically Different Moisturizing Gel. Why? Because it contains a few different silicone derivative, glycerine and it's in gel form. Everything that I need to revive my liner in one product!

Number referring to picture below:
  1. Dried up cream liner - can you see how it shrinks away from the jar wall. It's hard and I have to really swirl my brush to soften it up.
  2. I add about 4 pumps of Clinique DDM Gel [pic 4]. And the I mix the DDM Gel and liner and heat it up hair dryer.
  3. It would turn out to something like this.
If you didn't heat the mixture long enough, the liner will smudge/transfer [pic 5]. So, heat it up a bit longer (make sure it doesn't boil), until the liner melt and mix nicely with the DDM Gel. In pic 6, you can see no smudging and the liner pigmentation is still good.

I had tried my eyeliner few times after I revived it. It works well, just like when I first started using it. The pigmentation is still good, it doesn't smudge and long lasting.

Hooray for Koren! Hooray for revived eyeliner! Hooray!!!

Saturday, January 22, 2011

Review E.L.F. Shine Eraser

E.L.F. Essential Shine Eraser, nice and catchy name for a simple oil blotter sheet. It comes in nice flap case made of paper with 50 sheets inside. The paper case is decent and last on me for few months. I like the slim case of Shine Eraser which make it convenient bring around.
Side by side size comparison to E.L.F. Studio Complexion Perfection.

It's an oil blotter, so it does absorbs oil and reduce shine, thus mattifies my skin. But I think pore minimizer, re-texturize skin and imperfections masking are outrages claim. Even with green tea extract, it is still only an oil blotter to me.

As comparison, I got a box of 300 sheets of oil blotter for Daiso for RM 5 and I bought the Shine Eraser for about RM4. So Daiso version priced a lil bit more than Shine Eraser, but it got 250 sheets more than Shine Eraser. I forgot to take picture of the Daiso version box. Hehehe.

In the picture above, I haven't blot my since 10 am, and it's almost 4pm when the picture was taken. You can see that my face has become grease ball. My forehead especially shine like crazy.
Noticed how badly Maybelline Great Lash Mascara smudge.
I blot left half of my face using E.L.F. Essential Shine Eraser and right half using Daiso oil blotter. Both works just as fine.

Picture with and without flash showing used and unused blotter sheets. Both Shine Eraser (left in pic) and Daiso blotter (right in pic) absorbs quite a lot. Usually I only need 1-2 sheets at one time. On very hot and humid weather, I could used up to 4 sheets to fully eliminates shine.


Since the Daiso blotter sheets box quite bulky and a lil impractical to slip into my wallet, I moved some of the sheets into the Shine Eraser case.

Final verdict: Shine Eraser is just a normal oil blotter, it works fine. However I would not repurchased as I find cheaper alternative.

The best Bohemian Rhapsody is by Queen.
The next best thing?
Cover by The Muppets. Even Brian May loves it.


Saturday, January 15, 2011

DIY: Depotting Broken Lipstick (Featuring Rain paperbag XD

If you read this post, you know that my ELF Essential Lipstick in Seductive was broken on its base. It makes applying the lipstick straight from the tube cumbersome. So I end up using lip brush to apply Seductive, and I find that still a lil cumbersome. What I did to fix the problem was depotting the lipstick to a jar.

Depotting the lipstick into jar make application using lip brush much much easier.

You'll need a hair dryer, a clean jar, something to scoop the lipstick out (spatula or any long tool can be used) and of course, a broken lipstick. First, transfer the broken lipstick into the jar and break it down to smaller pieces. Remember to scoop out the rest of the lipstick in the container.

Then, heat up the lipstick using hair dryer. This may take 15 to 20 minutes. When the lipstick melted, stir with your tool (ex.: spatula) and even out the lipstick surface in the jar by picking up the jar about 15cm high and drop it to the table top few times. Once you're satisfied, close the jar and stick the lipstick label to the bottom of the jar.

One thing to take note is not to overheat the lipstick until it boil because it will change the lipstick texture.

I learn this from Koren of Enkore Makeup in YouTube. You can find a lot of DIY tutorial in his channel that are useful in cases like this.

Thursday, January 13, 2011

DIY: CD Palette and Depotting.

There nothing original about this post, you can find all sort of information regarding DIY palette and depotting all over the internet.

I have few CD cases at disposal and I thought, why don't I depot all of my ELF Brightening Eye color quads.

You will need empty CD case, palettes to depot, tweezer, pointed tool, super glue and lighter.
First, remove the middle part of the CD that nest the disk, and now you have your empty palette. To remove the pan for its casing, heat up the bottom of the pan for 20-30 seconds. Long enough to melt the glue. To be on the safe side, I would recommend using candle or hair dryer instead of holding the lighter like I do. Oh ya, remember to remove the palette name sticker at the bottom of the palette first before you started depotting.

Using pointed tool, slip the pointed end in the gap between the pan and the casing, and try to lift the pan out. If the pan won't budge, heat the bottom a lil longer and try again. Next, apply super glue to the bottom of the pan and place it in your DIY palette accordingly. Tilt the palette to see if the pan sticks to palette.

Now repeat as needed. As you can see below, I arranged the eyeshadow according to its quad group and place the name label next to it.
A test to see if all the pan sticks nicely to the palette. One lesson I learn is that to be patient while depotting, don't force the pan out too much. I forced it and I got few eyeshadows cracked and broken.

Wednesday, January 12, 2011

FOTD and NOTD: 12th January 2011

Today I'm showing some love to my ELF Essential Brightening Eye Color in Blue Moon that I rarely used. I pair ELF Essential Lipstick in Classy with Super Glossy Lip Shine in Pink Kiss.

Here are swatches for Etude House nail polishes that I got from my last haul in 2010.

Wednesday, January 5, 2011

Review: ELF Essential Individual Lash Kit

Now, this is something very new to me. I'm used to strip lashes, and I find it's hard to put on and quite uncomfortable. I thought individual lashes would be worse, but I'm totally wrong.

This kit comes with 18 individual lashes in contour tray and useless dried glue. To put this lashes on, you only 1 or 2 drops of glue. I used tweezers to put it on as it give me more control. It is much easier to put on than strip lashes. Far more comfortable too! It's so light that it doesn't feel like I have lashes glued on my lash line.

In the picture above, middle row, I put on seven individual lashes on my right eye (left in the picture) and non on my left eye. The result is very natural and flattering. It only need a little trim to make it perfect. Well, you can always trim by yourself to customize it.

As long as you are gentle with this lashes, it is definitely reusable. Usually, after I removed it, I clean up the glue, put on tiny bit of new glue and stick it back to the contour try to maintain its shape.

Would I repurchase? If ELF got 50% or more discount, yes.
Would I recommend it? If you want comfortable, natural looking lashes. Yes.

Friday, December 24, 2010

Review and Swatches: ELF Essential Lipstick (Classy, Gypsy, Seductive and Posh)

Boy, this lipsticks are pleasant surprise. 3.5g for $1, they really worth it. Typical of ELF Essential, this lipsticks packaging are cheap. It is light and kinda flimsy, but I love the clear plastic part of the lipstick tho. It have strong scent in tube, but the scent is very weak when applied. The lipstick are a bit hard. When I first received 'em, I have to glide it many times on my lips to apply it. It is easier to apply after you warm it up a bit. I guess, warming at the back of your hand would help soften it.

From left to right - Classy, Gypsy, Seductive and Posh

The texture is kinda creamy and I think it's a semi-matte lipstick since it have subtle sheen to it. It's not drying on my lips. The best thing, none of the lipstick I ordered are frosty. No glitter, no shimmer. Yay! I'm not sure how long lasting this lipstick is since I always reapply lipstick or lipgloss. Ok, this lipstick actually last quite long, I only need to reapply after meal. It didn't fade or feather after few hours. That is impressive considering that these lipstick only cost $1 each.

Clockwise - Gypsy, Posh, Seductive, Classy

The pigmentation of this lipstick are great. I find this lipsticks works great as lip stain or as sheer lipstick. If you layer the application, it would go semi-opaque. Basically, the color is buildable. Great huh!
  • Classy is nude pink, sort of lipstick version of Pink Kiss gloss except for the blue undertone.
  • Gypsy is light pink mauve.
  • Seductive is muted coral pink, sadly, Seductive broke at the base the first time I used it.
  • Posh is a very wearable red lipstick, it's more to maroon color.
Would I repurchase? If they got new color, a big YES! After all, it's only $1 each.

I found that these lipstick works great together with the ELF Super Glossy Lip Shine.

The swatches online are not accurate, so I would suggest finding more swatches pics from blogs and all. My description might not be accurate. The swatches picture may vary from different screens and lighting.

p/s: I'm going to JB this evening on Air Asia flight. Luckily, few days ago, I went to the website to double check my flights. Guess what? Typical of Air Asia standard, they change my flight schedule without informing me anything about it. Last time they did this, they call me to let me know. Not this time. So, boo~ to Air Asia. Anyway, for those flying to JB, Brunei, Sibu and Kuala Terengganu, there are no counter check in available from now on, so remember to check in via web, mobile or through the self check-in kiosk days or 2 hours before your flight, Air Asia won't be responsible if you couldn't check in because they don't have enough kiosk or its broken.

Wednesday, December 22, 2010

ELF Mini Haul and Gift from Jiyuu.

I received a very interesting book and two pairs of gorgeous earrings from Jiyuu last Tuesday. The book, Sentimental Murder is one of the most unique and interesting book that I have. I'm hooked!
This morning I received my ELF parcel. The brush belt is second hand item, but I'm surprised to see how dirty it is when I opened the parcel. So I clean it up using baby oil since water and diluted detergent doesn't seem to work. Finally I got the cream eyeliner in Metallic Olive, it's a very pretty khaki cream eyeliner.

Tuesday, December 21, 2010

Review: ELF Mineral Blemish Kit.

Reviews at E.L.F. website are mainly positive, while reviews from many blogs are mainly negative. I'm a little skeptic about E.L.F. Mineral Blemish Kit that I never really placed an order eventho I've been eye-ing this product for quite sometime.

I finally got the chance to try this product when I swap my wax kit with electronicfly. Coincidentally, the time when the Blemish Kit arrived was the time of the month. So I got few pimples than I can treat with the product to see if it works or not.
picture taken from www.eyeslipsface.com

I apply it once or twice a day by patting the powder on targeted area using concealer brush. According to the website, it described the product as sheer. I find it is not that sheer. So I limit the use before bed time or when I'm not going out.

It is best to apply the product little by little as it tend to mess up if you pick up to much using brush. The product have faint sulfur scent as sulfur is one of the main ingredients. I applied this product after moisturiser. Part of my skin where the powder applied felt a lil tight. I find this product does nothing to conceal blemishes eventho it categorised as concealer in ELF website.

7 Days Observations

Day 1 - I didn't see any immediate effect of the powder.
Day 2 - Pimple on my chin grow much larger than the day before. No much difference observed for pimples on my forehead.

Day 3 - Pimple on my chin was popped accidentally when I wash my face. I think the Blemish Kit help speed up the whole time taken for pimple to popped and heal.
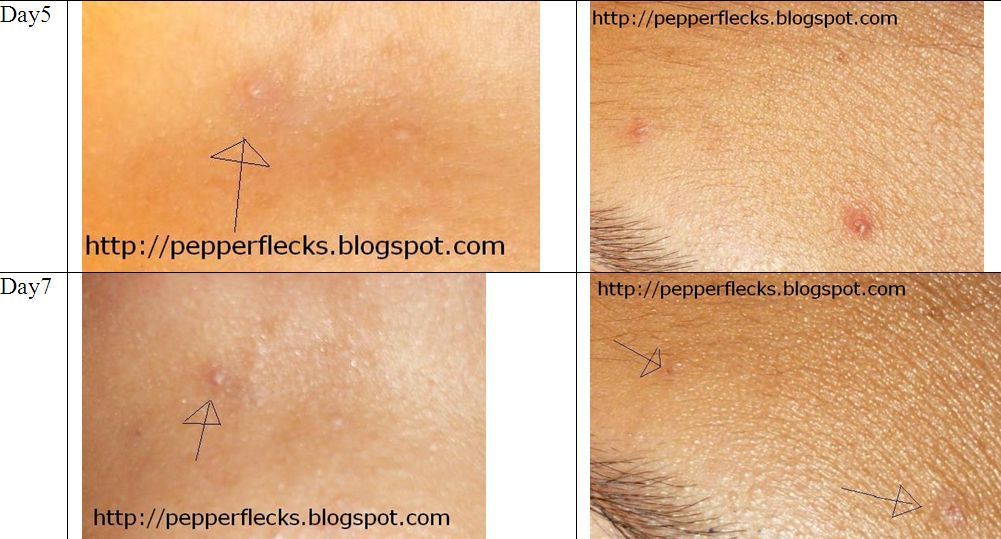
Day 4 - Pimples on my forehead noticeably larger than in Day 2 and 3.

Day 5 - Pimples on my forehead pretty much gone. Pimple scar on my chin dried up and healing.
Day 7 - Pimples on my chin and forehead totally gone. Because I didn't picked the pimples, the scaring much lesser and by the time of writing is not noticeable.

After testing the product for weeks, I can say that this products really works for me. It takes about 7 days to reduce pimples. Prior to Blemish Kit, pimples would take about two weeks to be totally reduced.

Aside from that, I think this product helps me reduce the urge to pick my pimples. It helps me feel that I did something to treat the blemishes. The powder reduce shine (absorbs oil) thus helping drying the pimple up. Whiteheads and blackheads on my nose and cheeks dried up after few days of application and come out much easier from pores. Another thing that I noticed when I used this product is that, pores between my nose and cheeks appear smaller. Since it's not that sheer, I wouldn't put this on if I'm going out.

Would I recommend it? Not really, since I read quite a lot of negative review, I think it is better if you try sample first before buying full size product. ELF did not sale sample size of this product, but you can try find depotted samples online. Would I repurchase it? Well, I'd placed an order for full size product few days ago. So, yes.

[EDIT]

I like to add something very interesting. I had stop using Everyday Mineral base and concealer as it make my pores clog like no tomorrow. Whenever clogged pores happen, my face will have weeks of pimples festival. Even with my Clinique 3-step skin care system, I have to wait days to weeks for the pimples festival to end. I find, by mixing the mineral blemish kit with Clinique Clarifying Lotion 3 into paste and apply it to pimples and let it on overnight, all the pimples and bump will dried up or for the super large one, it will reduced significantly. Cool!

Monday, December 20, 2010

FOTD and Update for Hair Color


Today lighting is perfect for capturing the red tone of my hair color. You can see from the picture above how my hair color differ in different lighting condition. One thing to note here is how even the dye color is. To read other post related to Prettia Bubble Hair Dye, click here.

I wearing ELF Essential Lipstick Classy paired with ELF Essential Super Glossy Lip Shine Pink Kiss. I'm pleased to find that nude pink lipstick works for me. For Pink Kiss review and swatches, click here. For Classy swatch picture, click here.

p/s: I looking for facial scrubs that works well for clogged pores. My skin still recovering from clogged pores that was caused by Everyday Mineral base.

Sunday, December 19, 2010

Review and Swatches: ELF Brightening Eye Color

Edit (26th Jan 2011): I had taken better swatches pictures for these quads over UDPP. To see it click here.

I love this quads, I have tried almost all of the quads that available and I finally find the one, well, ten, that I like.

I find that the quad with matte finishes are not good. I couldn't make Brownstone, Hazy Hazel, Punk Funk and Matte Mauve work for me. The eyeshadows are too hard that I have to really rub my brush to pick up the product. It's not that pigmented and hard to blend. Pretty n' Pink and Ethereal on the other hand is too light to show up on my skin. I think it would work for porcelain fair people. Glam and Rocker are glitter madness, not all in the quads are glittery tho. I'm too old for glitter.

There are 18 different quad for Brightening Eye Color, we've gone through 8 of them. The rest, the 10 quads are the better of the lot. What they have in common is that most of them are shimmery shades.

Swatches were done w/o any base or moisturiser. Primer and bases surely will help bringing out the color vibrancy.

From to bottom:
  • Blue Moon - The dark blue, off-white and brown are soft and pigmented. The light blue is a little chalky and not so pigmented
  • Butternut - My favourite neutral palette, this quad blend easily. The lightest color is a bit hard (to pick up using brush) compared to the other 3.
  • Day 2 Night - I think this is the best of all the quads. The black is matte with slight shimmer. The other eyeshadows in the quad have metallic sheen to it.
  • Drama - Great for smokey eyes. The white is matte, but crazy pigmented. The greys have shimmer and glitter, but still okay. The black is not so pigmented, but works with the other eyeshadow in the quad.

From top to bottom:
  • Ivy -My go to palette. The quad pigmentation is great for everyday use, furthermore, the shades complement my dark brown eyes very well.
  • Luxe - Luxurious! The color are so pigmented and gorgeous, easy to blend too.
  • Nouveau Neutrals - The color doesn't show up very well on my medium skin. But I still like this for days when I'm too lazy for makeup. Well, you hardly go wrong with color that barely shown on your skin.

From top to bottom:
  • Nymph Dream - If I want a pop of color, this quad is the one I reach for.
  • Silver Lining - another palette that is gorgeous for smokey eyes. All the eyeshadows in this quad are soft and pigmented.
  • Teal Dream - Just like Silver Lining, All four eyeshadows in this quad are soft and pigmented. The blue especially is lovely with iridescent shimmer.
Eventho the packaging is small and cheap, I have no complaint. After all, it's only $1. I have no problem dipping my brush into the eyeshadow triangular pan. The size of these eyeshadow are small, but since it's quite pigmented, I think it gonna last for quite some time. This quads are far from perfect, some are powdery, the other a lil chalky. But all in all, it's great for the price. One more thing, these quads needs good primer or base to show its true potential. NYX Eyeshadow Base in White really bring out the quads vibrancy.

Would I repurchase? If I finished it up, yes.
Would I recommend? Only the ten quads that swatched in this post.

Tutorial: Lazy Sunday Green Smokey Eyes

I have this sudden urge to make a youtube video, sadly my skin is recovering from nasty clogged pores (I'm blame you Everyday Minerals base). My skin is currently in a bad condition, with redness and tiny bumps of clogged pores, doesn't look that good. Since I really wanted to do something about the video, I end up doing this tutorial. FYI, I'm not in anyway queen of blending or master of the eye makeup, but I think I did decent job for someone who learn doing makeup from blogs and youtube videos.
  • A - Apply ELF Mineral Eyeshadow Primer all over the lid up to browbone.
  • B - Apply ELF Studio Cream Eyeliner in Black on the lid extended a little over the crease as base.
  • C - Pat darkest green in ELF Essential Brightening Eye Color Ivy over the black base in B.
  • D - Apply light brown in ELF Essential Brightening Eye Color Luxe as browbone highlight.
  • E - Apply brown in ELF Essential Brightening Eye Color Ivy between C and D, blend.
  • F - Apply light grey in ELF Essential Brightening Eye Color Teal Dream on the inner corner.
  • not in picture, apply NYX Black single eyeshadow on the outer corner on top of the dark green and blend to add dimension.
For under the eye, apply light grey in ELF Essential Brightening Eye Color Teal Dream 1/3 from inner corner, darkest green in ELF Essential Brightening Eye Color Ivy 1/3 in the middle and NYX Black single eyeshadow 1/3 from the outer corner.

Lastly line the eyes with ELF Studio Cream Eyeliner in Black and apply mascara. I used Maybelline Great Lash, I can't wait to finish it up.
The camera wash out the intensity of the eyeshadow. It actually look dramatic, the kind of look I prefer for night time out.
Related Posts Plugin for WordPress, Blogger...

Nuffnang

Page Numbers