I always wanted to do a tutorial on konading and I think it is best done using video instead of series of pictures.
The technique pretty simple, but it takes a lot of practice to get it right. Once you get used to it, Konading will take less than 10 minutes to be done (granted you're using fast drying base color ^_^).
So yeah, if you interested to try Konad, but unsure if you can do it, I say just get the small promo kit and practice until you're are confident. I'm addicted to this that I changed my nail polish and the konad almost everyday. It's really fun.
For those in Malaysia, rejoice as I had found a great dupe for Konad Top Coat and Special Nail Polish in Black. It's Elianto Nail Color in Transparent #01 and Twilight #40. I dare say Elianto quality is superior compared to the Konad version.
Showing posts with label Tutorial. Show all posts
Showing posts with label Tutorial. Show all posts
Sunday, April 3, 2011

Thursday, March 31, 2011
Pepper's Fuss Free Easy Daily Make Up
No, I'm not fixed with one look for my daily make up, but the one I'm sharing with you today is the fool-proof version. Tried and tested, is the confirmed way to brighten up my face.
The key to this look are
The key to this look are
- Base - my face have too much blemish, so concealing and medium to full coverage is a must. Long-wearing foundation preferable as I sweat a lot.
- Green eyeshadow and eyeliner - green really flatter brown eyes and colored eyeliner instantly brighten the eyes.
- Coral blusher and lipstick -warm shade such as coral suit my olive skin tone very well.
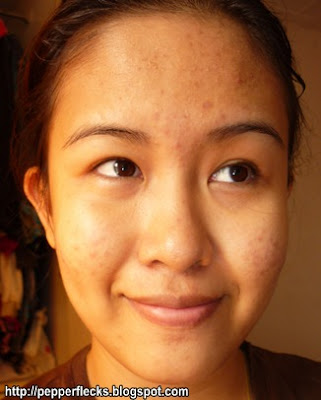
Start with clean, toned and moisturised face. You can see in the picture above how terrible my current skin condition, that's the aftermath from using Everyday Minerals base. My skin reacts badly causing clogged pores and ultimately endless pimples party. Now, pretty much all the pimples gone, but it left a lot of undesirable hyperpigmentation. Ok, to start of, I apply Biore UV Perfect Face Milk SPF 50+ PA+++ sunscreen. This sunscreen is so awesome that it double as a make up base. I used Stage Photo Pro Creme Camouflage in Ginger to conceal dark circle and blemishes all over my face. For base, I use Revlon Colorstay in Golden Beige mixed with Clinique Dramatically Different Moisturizing Gel. This make the foundation easier to apply and blend. It also dilute the foundation, making it perfect for daily use.
 Apply UDPP to the lid. UDPP is the only base the really works on my oily lid. I used green eyeshadow as it match very well with coral blusher and lipstick I'm using for this look. I used Stage Eye Liner in Teal Theater, using black eyeliner can be boring at times. Lastly, fuss free mascara from Avon.
 Finish up the look with ELF Studio Blush in Candid Coral and Stage Wonderlust Lipstick in Sarah.
 The finished look. My skin more even and most blemishes concealed. More importantly, I didn't look pale or sick. When I went out to buy lunch bare faced, without any makeup, people will ask if I'm okay or I'm sick or not.
p/s: -SometimesMost of the time, I'm too lazy, so I used BB cream as base and skipping concealer and sunscreen.


Monday, January 24, 2011
DIY: Reviving Dried Up Cream Eyeliner.
Gel and cream eyeliner for me is one of the best makeup product for eyelining. Pencil liner, regardless of quality smudge on me, liquid eyeliner? I wish I have steady hands and I always managed to transfer the liner to my upper lid. So gel/cream liner is the only thing that works for me.
Typical gel/cream eyeliner packaged in jar with very large opening. The opening cause moisture in the product evaporated and we're left with dried up liner. Any gel or cream eyeliner will dried up, it's just matter of time. Even MAC paint pot dried up in its glass jar. There are even cases when the eyeliner arrived to the customer dried up (this happens a lot with Coastal Scents gel liner)
There are few tips on preventing gel/cream eyeliner from drying up
And then, one day, an awesome makeup guru uploaded a video in YouTube and it's the very video that I need to revive my eyeliner! Koren aka EnKoreMakeup come up with a way to revive gel eyeliner, so I thought it might work for cream eyeliner too. Go and watch the video, you'll see what a genius Koren is :) In the video, he explains what actually happen, how to solve the problem and share some useful tips.
After I watched the video, I was too excited to try it, but I don't have any product that he actually used in the video. So, I have to postpone it. Luckily, I thought of using Clinique Dramatically Different Moisturizing Gel. Why? Because it contains a few different silicone derivative, glycerine and it's in gel form. Everything that I need to revive my liner in one product!
Number referring to picture below:

I had tried my eyeliner few times after I revived it. It works well, just like when I first started using it. The pigmentation is still good, it doesn't smudge and long lasting.
Hooray for Koren! Hooray for revived eyeliner! Hooray!!!
Typical gel/cream eyeliner packaged in jar with very large opening. The opening cause moisture in the product evaporated and we're left with dried up liner. Any gel or cream eyeliner will dried up, it's just matter of time. Even MAC paint pot dried up in its glass jar. There are even cases when the eyeliner arrived to the customer dried up (this happens a lot with Coastal Scents gel liner)
There are few tips on preventing gel/cream eyeliner from drying up
- Keep in glass jar. I don't really know why, but I keep hearing people talking about how gel or cream product in glass jar didn't dried up as fast as the one in plastic jar.
- Cap the jar tightly.
- Store it upside-down.
And then, one day, an awesome makeup guru uploaded a video in YouTube and it's the very video that I need to revive my eyeliner! Koren aka EnKoreMakeup come up with a way to revive gel eyeliner, so I thought it might work for cream eyeliner too. Go and watch the video, you'll see what a genius Koren is :) In the video, he explains what actually happen, how to solve the problem and share some useful tips.
After I watched the video, I was too excited to try it, but I don't have any product that he actually used in the video. So, I have to postpone it. Luckily, I thought of using Clinique Dramatically Different Moisturizing Gel. Why? Because it contains a few different silicone derivative, glycerine and it's in gel form. Everything that I need to revive my liner in one product!
Number referring to picture below:
- Dried up cream liner - can you see how it shrinks away from the jar wall. It's hard and I have to really swirl my brush to soften it up.
- I add about 4 pumps of Clinique DDM Gel [pic 4]. And the I mix the DDM Gel and liner and heat it up hair dryer.
- It would turn out to something like this.

I had tried my eyeliner few times after I revived it. It works well, just like when I first started using it. The pigmentation is still good, it doesn't smudge and long lasting.
Hooray for Koren! Hooray for revived eyeliner! Hooray!!!
Saturday, January 15, 2011
DIY: Depotting Broken Lipstick (Featuring Rain paperbag XD
If you read this post, you know that my ELF Essential Lipstick in Seductive was broken on its base. It makes applying the lipstick straight from the tube cumbersome. So I end up using lip brush to apply Seductive, and I find that still a lil cumbersome. What I did to fix the problem was depotting the lipstick to a jar.
 Depotting the lipstick into jar make application using lip brush much much easier.
 You'll need a hair dryer, a clean jar, something to scoop the lipstick out (spatula or any long tool can be used) and of course, a broken lipstick. First, transfer the broken lipstick into the jar and break it down to smaller pieces. Remember to scoop out the rest of the lipstick in the container.
 Then, heat up the lipstick using hair dryer. This may take 15 to 20 minutes. When the lipstick melted, stir with your tool (ex.: spatula) and even out the lipstick surface in the jar by picking up the jar about 15cm high and drop it to the table top few times. Once you're satisfied, close the jar and stick the lipstick label to the bottom of the jar.
One thing to take note is not to overheat the lipstick until it boil because it will change the lipstick texture.
I learn this from Koren of Enkore Makeup in YouTube. You can find a lot of DIY tutorial in his channel that are useful in cases like this.
 Depotting the lipstick into jar make application using lip brush much much easier.
 You'll need a hair dryer, a clean jar, something to scoop the lipstick out (spatula or any long tool can be used) and of course, a broken lipstick. First, transfer the broken lipstick into the jar and break it down to smaller pieces. Remember to scoop out the rest of the lipstick in the container.
 Then, heat up the lipstick using hair dryer. This may take 15 to 20 minutes. When the lipstick melted, stir with your tool (ex.: spatula) and even out the lipstick surface in the jar by picking up the jar about 15cm high and drop it to the table top few times. Once you're satisfied, close the jar and stick the lipstick label to the bottom of the jar.
One thing to take note is not to overheat the lipstick until it boil because it will change the lipstick texture.
I learn this from Koren of Enkore Makeup in YouTube. You can find a lot of DIY tutorial in his channel that are useful in cases like this.
Sunday, December 19, 2010
Tutorial: Lazy Sunday Green Smokey Eyes
I have this sudden urge to make a youtube video, sadly my skin is recovering from nasty clogged pores (I'm blame you Everyday Minerals base). My skin is currently in a bad condition, with redness and tiny bumps of clogged pores, doesn't look that good. Since I really wanted to do something about the video, I end up doing this tutorial. FYI, I'm not in anyway queen of blending or master of the eye makeup, but I think I did decent job for someone who learn doing makeup from blogs and youtube videos. 
Lastly line the eyes with ELF Studio Cream Eyeliner in Black and apply mascara. I used Maybelline Great Lash, I can't wait to finish it up.
 The camera wash out the intensity of the eyeshadow. It actually look dramatic, the kind of look I prefer for night time out.

- A - Apply ELF Mineral Eyeshadow Primer all over the lid up to browbone.
- B - Apply ELF Studio Cream Eyeliner in Black on the lid extended a little over the crease as base.
- C - Pat darkest green in ELF Essential Brightening Eye Color Ivy over the black base in B.
- D - Apply light brown in ELF Essential Brightening Eye Color Luxe as browbone highlight.
- E - Apply brown in ELF Essential Brightening Eye Color Ivy between C and D, blend.
- F - Apply light grey in ELF Essential Brightening Eye Color Teal Dream on the inner corner.
- not in picture, apply NYX Black single eyeshadow on the outer corner on top of the dark green and blend to add dimension.
Lastly line the eyes with ELF Studio Cream Eyeliner in Black and apply mascara. I used Maybelline Great Lash, I can't wait to finish it up.
 The camera wash out the intensity of the eyeshadow. It actually look dramatic, the kind of look I prefer for night time out.
Thursday, December 16, 2010
Tutorial: Luxe
 Hi, this is more to 'How I put my makeup on' more than a tutorial. I do this for all the laughs and giggles.
1) Apply ELF Essential Eyelid primer and blend.
2)Using ELF Essential Eyeshadow Brush, apply 'A' in Luxe quad 2/3 from eyes inner corner.
3)Using the same brush in step 2, apply 'B' 1/3 from eyes outer corner. Blend 'B' into 'A' using ELF Blending Eye Brush.
4) Using ELF Blending Eye Brush, apply 'C' in the outer corner and blend into crease.
5) Apply 'D' using ELF Blending Eye Brush on crease and blend to brow bone
Finally, apply eyeliner, mascara or/and false lashes. In the picture below, I put on 3 pieces of ELF Individual Lash Kit on the outer corner. I love how natural looking the lashes are, it can be trim for customization. It a lot more comfortable than strip lashes.

I actually enjoy preparing the pictures for this post. I don't have Adobe Photoshop or some special softwares, so I just use Paint, Microsoft Office Picture Manager and Powerpoint.
Monday, October 18, 2010
Trying to look like a Seductive Vampire
Michelle Phan's Seductive Vampire tutorial always annoys since May this year as I always fail recreating the look. I'm not Michelle Phan fan, but I acknowledge her skill as a makeup artist. I stop watching her video after it she started making her youtube video more as advertisement.
Since it's October and my favourite club organising Halloween party with vampire theme, I revisit the video and tried to recreate the look. Surprisingly, I do well, relative to what happened before. I forgot to put on eye shadow primer, so the eyeshadow crease a lil when the look almost complete. On contrary to M. Phan, this look was done using mostly drugstore makeup, majority of it is from ELF.

I used Skin79 Super+ Hot Pink BB Cream as foundation as it is much much lighter than my skintone and set it using ELF Studio Complexion Perfection. Both applied using ELF Studio Powder Brush. Brows defined using ELF Studio Eyebrow Kit
 Red eyeshadow in ELF Essential Luxe Brightening Eye Color Quad is the closest to rusty color that I have. Obviously, I failed in my attempt to contour my nose. I used the second darkest color in Brownstone Brightening Eye Color.
Used the darkest color in ELF Essential Butternut Brightening Eye Color give dimension to the eyes. Lined upper lash line ans waterline using ELF Studio Cream Eyeliner (Black) and add black from ELF Essential Drama Brightening Eye Color to the outer v and to smudge the eyeliner.

 ELF Studio Blusher in Mellow Mauve applied to hollow of the cheeks. L.A. Colors Lipstick in Jazzy Red applied. (I think Luscious Wine suit this look much2 better). Add some "blood" to complete the look.


Subscribe to:
Posts (Atom)
